
Learn how to easily export your WooCommerce customers email, name and address to Google Sheets using Google Apps Script. The script will create a new tab in your Google Sheet and copy the data from the WooCommerce customers table.
Most probably, if you have a WordPress-based online store, it passes through WooCommerce during the holiday season, when everyone wants special discount codes for their next purchase or wants to know how their business is actually doing by analyzing data of the store.
You can further export a list of customers directly by using WooCommerce’s export feature. It exports the data in a CSV file that can then be imported into Google Sheets. Go to the WooCommerce dashboard, click on the customers list then download the customers list as a csv file.
If you would like to export customers with WooCommerce in a far more efficient manner, then you can indeed use Google Apps Script for creating a custom script that would automatically export the customers over to a Google Sheet.
Step 1: Create an API Key in WooCommerce
First of all, get an API key in WooCommerce. This you do by logging into the back end of WooCommerce, then heading to its settings section, and then selecting the “Advanced” tab. Upon getting into this Advanced tab, scroll down to the “Rest API” section then click the “Create API Key” button.

Then, you are going to be asked to assign a name to your API key. It can be something like “Import Customers to Google Sheets” or whatever name it could have in that regards. We’ll limit the permissions of our API key to read only because that’s all that we are going to use this for: reading customer data and nothing else.
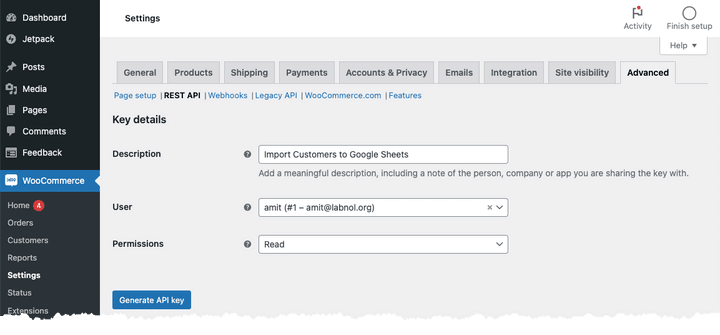
In this case, WooCommerce will create your consumer key as well as consumer secret for you. In the meantime, you have to store somewhere your secret key since it’s impossible to view it later using the dashboard of WooCommerce.

Step 2: Create a Google Sheet
Now that you have those WooCommerce credentials, let’s create a Google Sheet in which we are going to keep your customer data. We do that by creating a new spreadsheet by typing this in the address bar of your browser: sheets.new Then, open your spreadsheet’s Google Apps Script editor found in Extensions > Apps Script.
Insert the following code into the Apps Script editor. Do remember to replace WooCommerce consumer key, consumer secret and WordPress domain with your values; do not append a slash at the end of the WordPress domain.
const MAX_PER_PAGE = 100;
const CONSUMER_KEY = '<<YOUR_CONSUMER_KEY>>';
const CONSUMER_SECRET = '<<YOUR_CONSUMER_SECRET>>';
const WORDPRESS_DOMAIN = '<<YOUR_WORDPRESS_DOMAIN>>';

const fetchWooCommerceCustomers = () => {
  const bearerToken = Utilities.base64Encode(`${CONSUMER_KEY}:${CONSUMER_SECRET}`);

  const getQueryString = (options) => {
    return Object.keys(options)
      .map((key) => `${key}=${options[key]}`)
      .join('&');
  };

  const getApiUrl = (pageNum) => {
    const options = {
      context: 'view',
      page: pageNum,
      per_page: MAX_PER_PAGE,
      order: 'desc',
      orderby: 'id',
      role: 'customer',
    };
    return `${WORDPRESS_DOMAIN}/wp-json/wc/v3/customers?${getQueryString(options)}`;
  };

  // Fetches a single page of customer data.
  const fetchPage = (pageNum) => {
    const url = getApiUrl(pageNum);
    const response = UrlFetchApp.fetch(url, {
      headers: {
        'Content-Type': 'application/json',
        Authorization: `Basic ${bearerToken}`,
      },
    });

    return JSON.parse(response.getContentText());
  };

  let page = 1;
  let allCustomers = [];
  let hasMore = true;

  do {
    const customers = fetchPage(page);
    allCustomers = allCustomers.concat(customers);
    page += 1;
    hasMore = customers.length === MAX_PER_PAGE;
  } while (hasMore === true);

  return allCustomers;
};
The above script will fetch all the customers from your WooCommerce store. Next, we’ll add a function to flatten the customer data and store it in a Google Sheet.
Step 3: Flatten the Customer Data
To flatten the customer data, we’ll add the following function to the script.
const parseCustomer = (customer) => {
  const { id, first_name, last_name, email, billing = {} } = customer;
  return {
    customer_id: id,
    first_name,
    last_name,
    customer_email: email,
    billing_first_name: billing.first_name,
    billing_last_name: billing.last_name,
    billing_email: billing.email,
    billing_phone: billing.phone,
    billing_address_1: billing.address_1,
    billing_address_2: billing.address_2,
    billing_city: billing.city,
    billing_state: billing.state,
    billing_postcode: billing.postcode,
    billing_country: billing.country,
  };
Step 4: Store the Customer Data
To store the customer data in a Google Sheet, we’ll add the following function to the script.
const exportCustomersToGoogleSheet = () => {
  const wooData = fetchWooCommerceCustomers();
  const customers = wooData.map(parseCustomer);
  const headers = Object.keys(customers[0]);
  const rows = customers.map((c) => headers.map((header) => c[header] || ''));
  const data = [headers, ...rows];
  const sheet = SpreadsheetApp.getActiveSpreadsheet().insertSheet();
  sheet.getRange(1, 1, data.length, data[0].length).setValues(data);
  const message = rows.length + ' customers exported to sheet ' + sheet.getName();
  SpreadsheetApp.getUi().alert(message);
};
Step 5: Run the Export Function
Inside the Apps Script editor, click on the “exportCustomersToGoogleSheet” function and then click on the “Run” button. Authorize the script and watch as your customers data from WooCommerce magically appears in your Google Sheet.


